UoP-WiFi
UoP-WiFi is the official unified wireless network of the University of Peradeniya, deployed campus-wide to provide secure, reliable, and seamless internet access for students, academic staff, and non-academic staff.
Introduced as part of the university’s long-term digital infrastructure upgrade, UoP-WiFi replaces legacy Wi-Fi systems with a single, centrally managed network that ensures improved security, better performance, and consistent connectivity across university areas.
Overview
Access to UoP-WiFi is provided through individual university credentials, ensuring accountability and secure usage. Users are required to get registered via the University SSO portal. Once registered, devices can be connected to the UoP-WiFi SSID using the same credentials.
To access the new WiFi network, you'll need to register on the university portal (auth.pdn.ac.lk). Once registered, you can connect to the new SSID (UoP-WiFi) using your registered credentials.
Thus, you are required to:
- Register on the university SSO portal: Visit the portal (https://auth.pdn.ac.lk) and follow the registration instructions. (instructions attached below)
- Connect to the new WiFi SSID: Find the new WiFi (UoP-WiFi) and connect to it using your registered credentials.
If you encounter any issues, please don't hesitate to contact us.
1. SSO - Portal Registration
For Students :
Please follow the following steps in order to get registered at the SSO
- Visit auth.pdn.ac.lk and get registered using your University Google Workspace (eg. XXX@abc.pdn.ac.lk) email address.
- Verify your email address by clicking on the link sent to the email (if you don't receive such email, check the spam).
- Log in to the account.
- Fill the form by clicking on the “Fill out your Details” button. (Select “Student” as the User Type)
- Once you’ve submitted the form, you can log in to the WiFi by using the credentials you've provided while registering. (Steps to log into the WiFi network is attached below)
Please make sure while filling out the form
- Make sure the “Name with Initials” field is formatted as A.B.C. Surname (Period after each initial, space between the last period and surname)
- The contact number is in the form +94XXXXXXXXX.
- Use your personal email address as the secondary email address.
For Staff Members :
Please follow the following steps in order to get registered at the SSO
- Visit auth.pdn.ac.lk and get registered using your University email address.
- We encourage you to use your Google Workspace (eg. XXX@abc.pdn.ac.lk),
- if you don't have one, you can use the pdn-webmail address (eg. XXX@pdn.ac.lk) email address.
- Verify your email address by clicking on the link sent to the email (if you don't receive such email, check the spam).
- Log in to the account.
- Fill the form by clicking on the “Fill out your Details” button. (Select “Staff” as the User Type)
- Once you’ve submitted the form, you can log in to the WiFi by using the credentials you've provided while registering. (Steps to log into the WiFi network is attached below)
Please make sure while filling out the form
- Make sure the “Name with Initials” field is formatted as A.B.C. Surname (Period after each initial, space between the last period and surname)
- The contact number is in the form +94XXXXXXXXX.
- If you have signed up with the webmail addres (eg. XXX@pdn.ac.lk) use your Google Workspace email address (eg. XXX@abc.pdn.ac.lk) as the secondary email address (vice versa).
If you don't have one, use your personal email address as the secondary email address (Staff Members are not allowed to use their personal email as the secondary email).
2. Connect to the University Wi-Fi Network
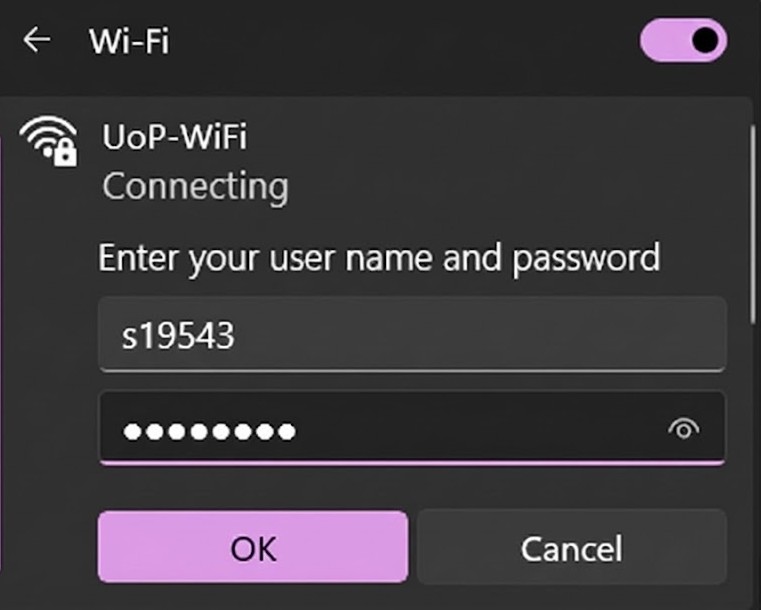
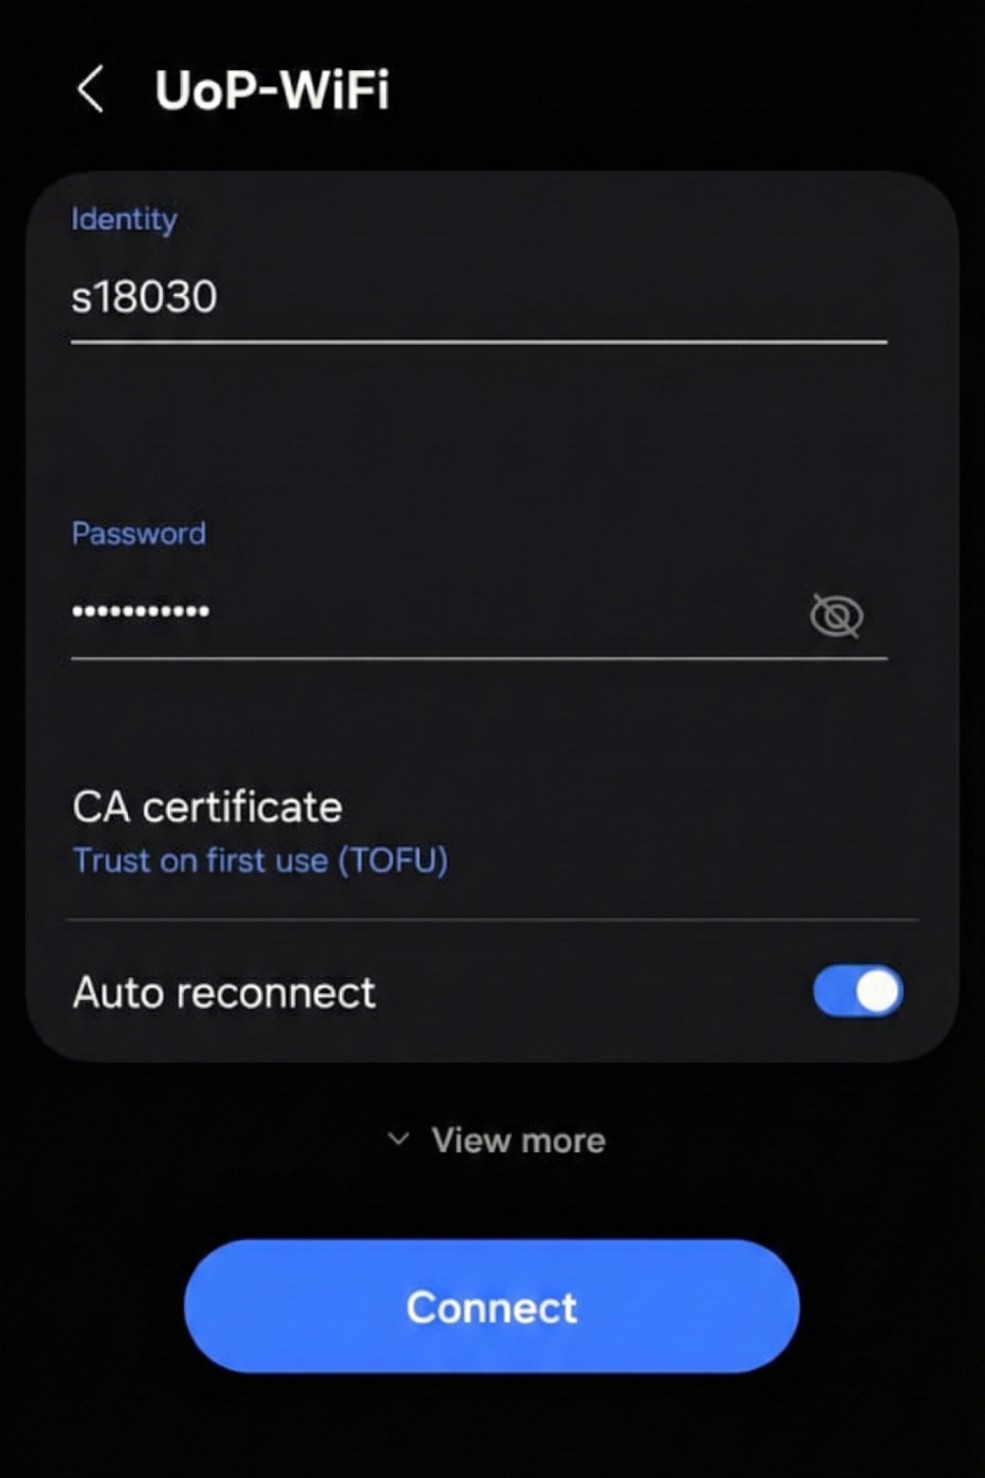
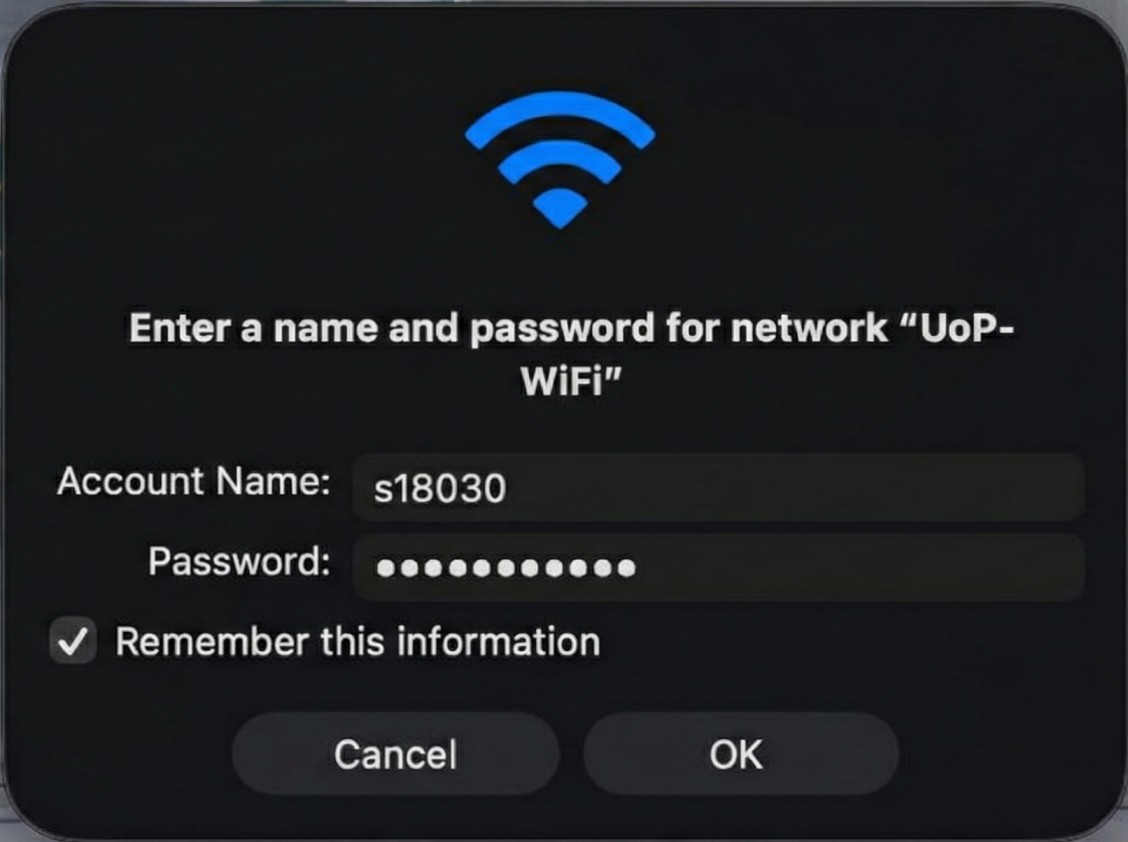
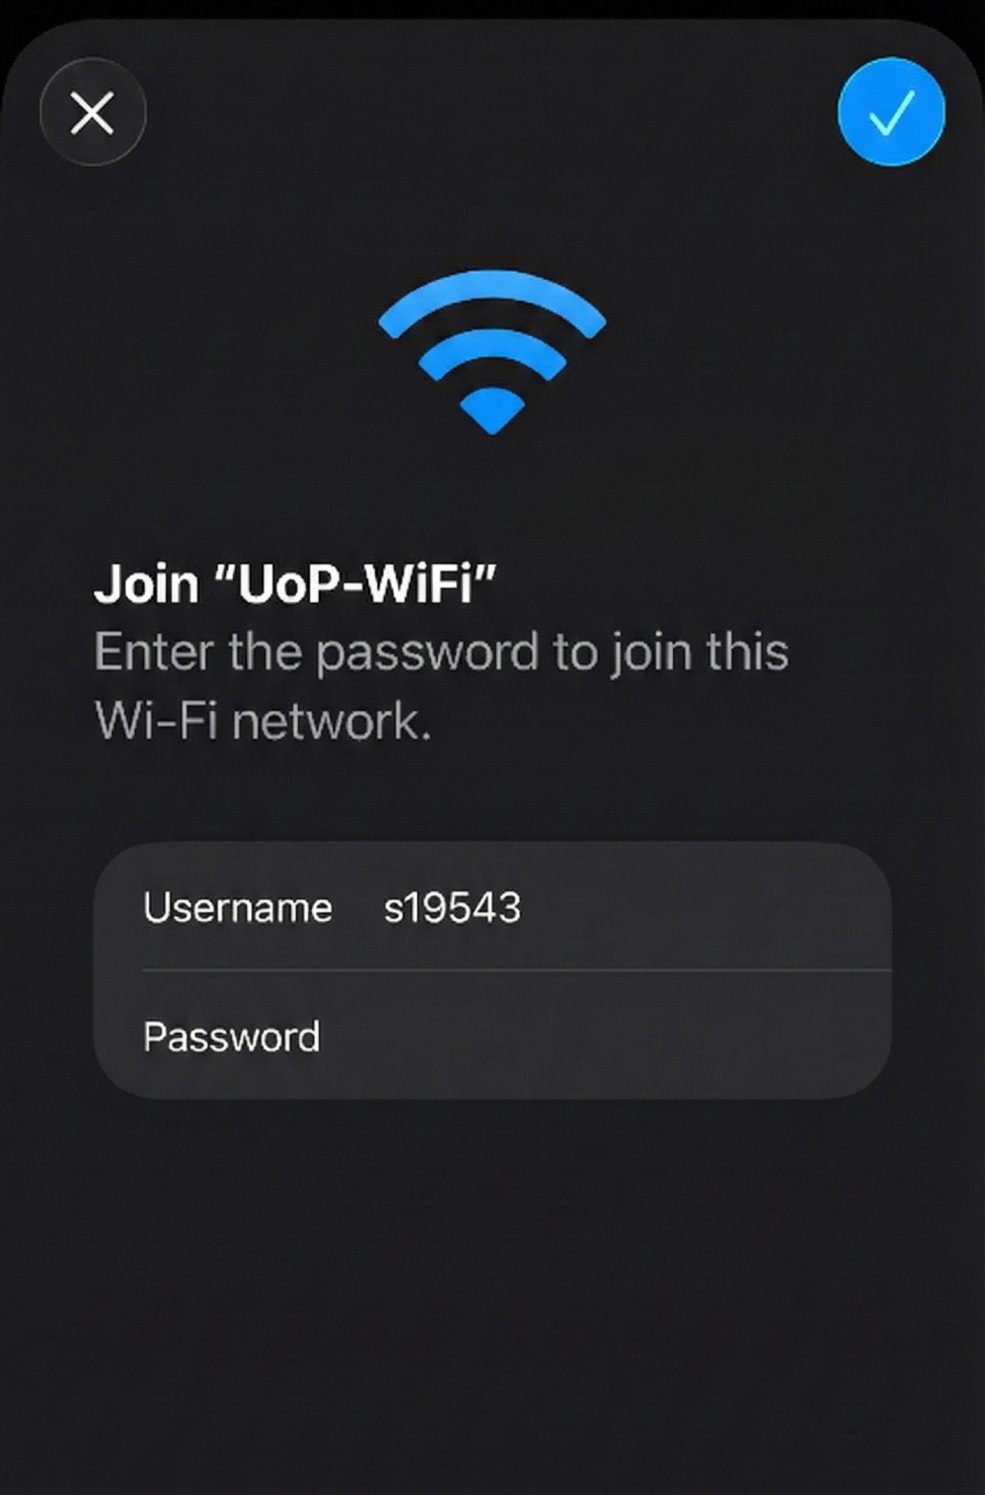
- Open Wi-Fi settings on your device and select the SSID: UoP-WiFi.
- Username: Enter your university email username without the domain (the same one used for SSO registration) (do not include “@abc.pdn.ac.lk”). For example if your email is john@abc.pdn.ac.lk , enter john as the username.
- Password: Enter the password you registered with in the SSO portal.
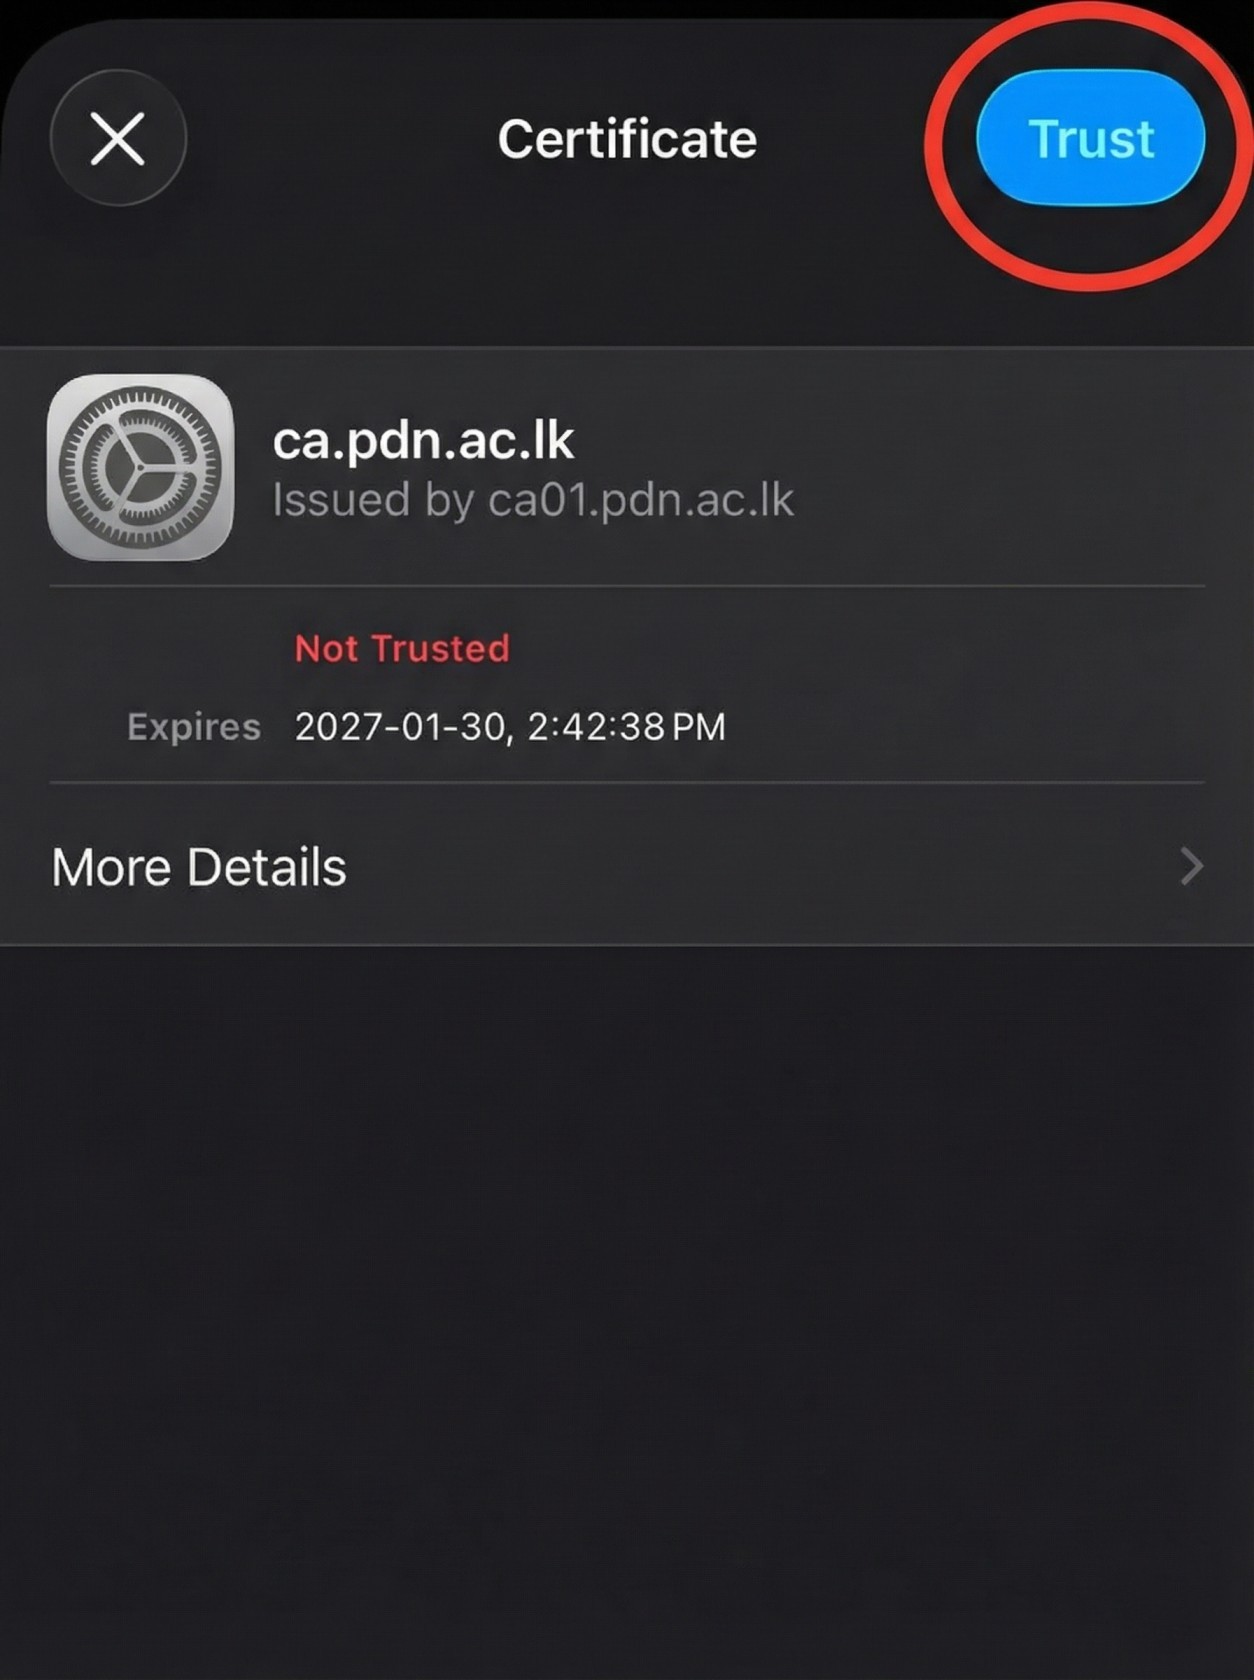
- If a certificate/security prompt appears, choose Connect / Trust / Accept (whichever is applicable to you) to proceed. Android Devices – CA Certificate Settings
- Select “Don’t validate” CA certificate (None), if the option is available.
-
If this option is not available on your device:
- Choose “Trust on First Use” and tap “Accept and Connect” when prompted.
-
OR manually install the CA Certificate (advanced method):
- Download the CA certificate from here.
-
Install the downloaded certificate via:
Wi-Fi Settings → More Settings → Install Certificates -
After installation, reconnect to UoP-WiFi and ensure:
- Online Certificate Status: Do not verify
- Domain / Host:
ca.pdn.ac.lk(if shown)
- Tap Save or Connect to complete the connection.
Windows
Android
macOS
iOS / iPadOS
Troubleshooting
- If you are unable to connect to UoP-WiFi after following the steps above, please refer to the Manual Connection Guide available here
- For further assistance, please contact the Network & Communications Services Unit (NCSU):
- Email: noc@pdn.ac.lk
- Phone: +94 81 239 3992